
Etsy back up.
https://www.etsy.com/shop/NorseWest
After forever the forge is back in action. Trying to find a trip to Denmark/Germany. no customs just what is on here is available for now. Not back to knives yet. Hammer arm is a bit rusty yet.

Skål.
Hröð-
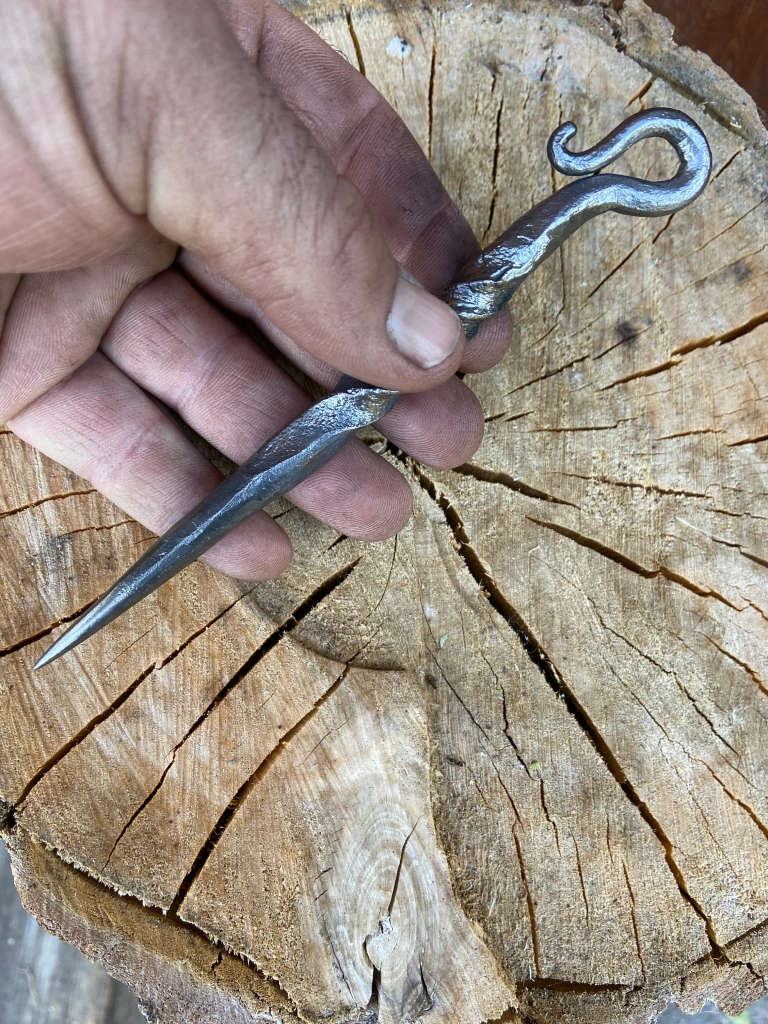
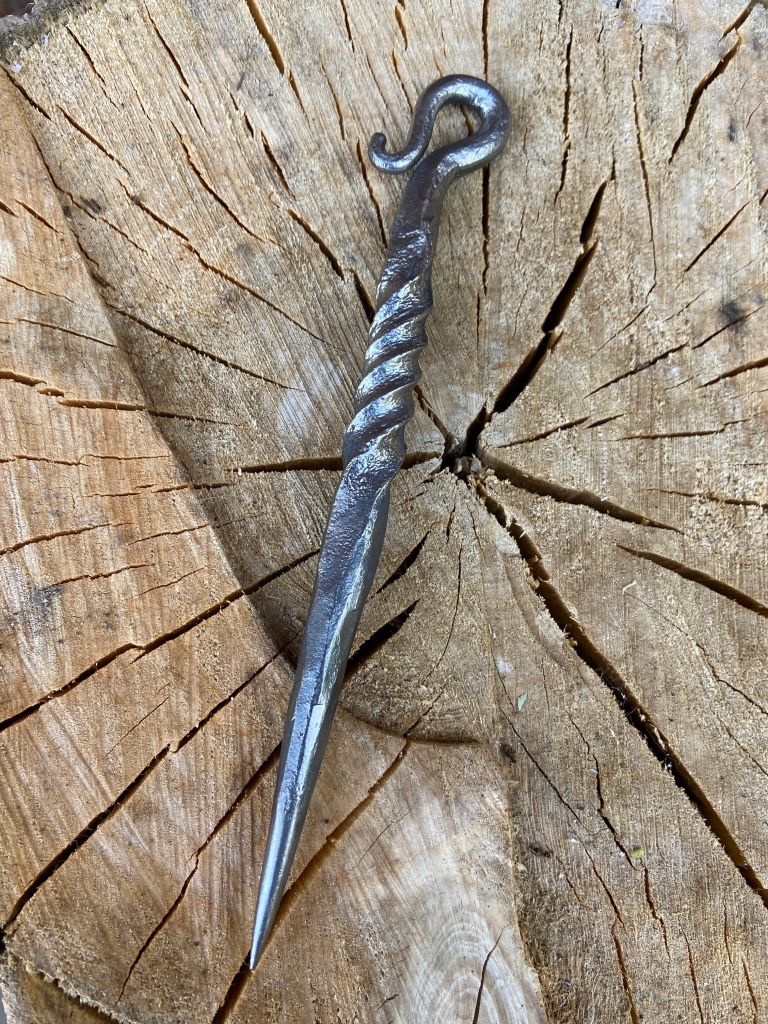
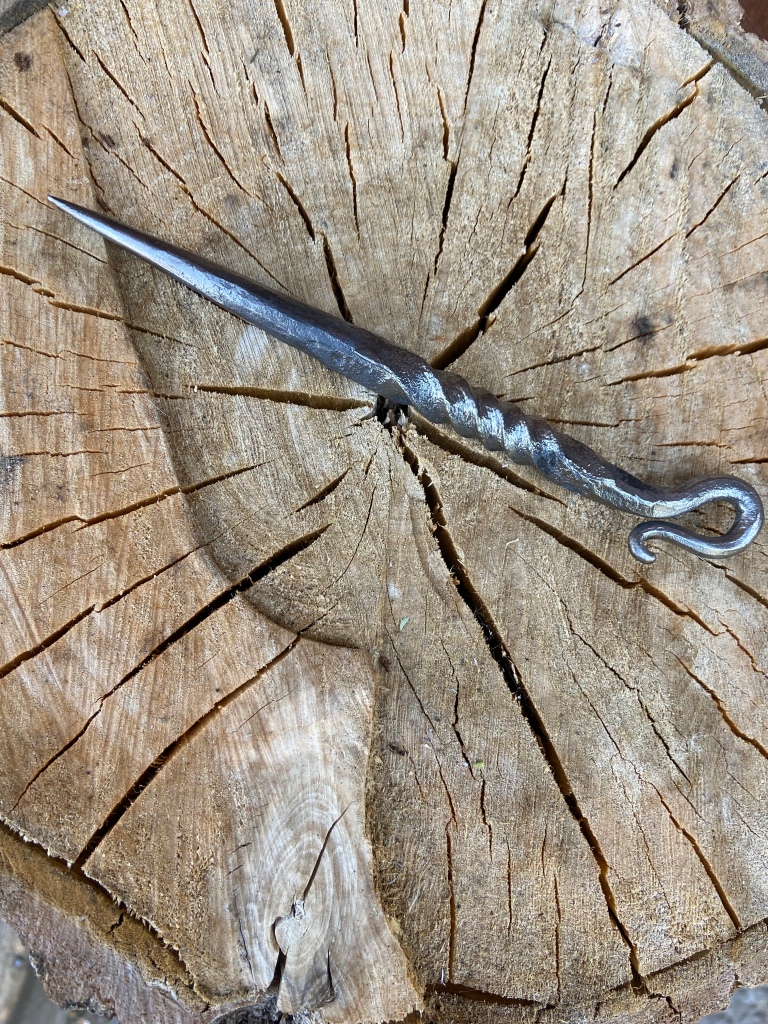
1018 The how and why of the most commonly found steel. MODERN IRON
This material seems to receive the most interest and curiosity of any metal for up start Blacksmiths/Knife makers and for a very good reason! It’s cheap and really easy to get at any hardware store or scrap pile. I have basically explained how and when to use this material for blades (In my opinion) but I decided to get a bit deeper into the actual details with a post solely about this material.
Modern Iron-The Tech:
In ancient times iron weapons were very low carbon forged “Coal Iron” blades that were hammer hardened instead of quenching. These blade had enough carbon to quench but the technique of hammer hardening was still popular from the bronze age materials. Essentially 1018 is the modern equal to this primitive iron in many ways. The carbon content is a reliable 0.18% and reacts to ancient iron techniques in a positive way but in reality is far superior to its ancient ancestor. It is durable, does not crack while forging, welds easily, hardens by water quenching, is easy to mill and does not require tempering.
So the big question is can I make a knife from it?:
YES AND NO:
Yes you can make an prmitive iron knife from 1018 that is stronger, sharper and holds a better edge than a alot of bronze age knives. Yes You could even make a formidable primitive sword that would do great damage and be dangerous but the edge retention would be very low and bending during battle plagues longer pieces like a sword blade then and now.
No you cannot make a modern utility knife from 1018 as the edge retention is too low.
The problem with 1018 as a blade steel is that the carbon content will cause it to harden but it in thin pieces can only achieve 42RC. The average knife is 52RC or higher. When forging a flat piece you may achieve higher carbon through the process of case hardening as the steel absorbs more carbon as it heats at high temperature but using this technique is only so successful. After quenching 1018 it will harden and be tough to bend and grind in your shop, the durability is extremely high which is a net positive in most uses.
So this the data available from me regarding this type if steel but I say use it for Athame and ceremonial pieces because it, in its own right has good features with durability and ease of forging for decorative and symbolic work. Iron is in fact a sacred metal in Norse culture and believed to ward off evil.
Hope this helps better explain 1018 because I know how it’s availability makes it very tempting to the beginning Smith.
GALLERY:


The above gallery are all 1018 creations and were very enjoyable to make. The French nail is actually historically accurate because French soldiers often fashioned them from mild steel L bolts.

H-
Scandi Edge Jig THE MIRACLE TOOL
First off before get into explaining this item the original place I saw it was http://www.youtube.com/user/captjeff78/videos and from a few other concepts of static knife edging jigs used in professional factories. I am not associated with Captjeff78 personally but he deserves credit for this great design and honestly the difference maker in my knives going forward. Youtube and many of these great knife video makers are adding valuable if not invaluable hands on info to the greater amateur knife making community so thank you to everyone in the education field regarding Blacksmith and knife making based information. I myself run this blog to help anyone who may be going through the head scratching parts of making knives and doing forge work.
Now onto the Visbjorn Scandi Edge jig!


Forgive the bad graphics but this item is rude, crude and ready to use!
The jig above I use to make Scandinavian Edge style knives to great effect! I can make the same knife with any depth of hollow ground I want and they are basically ready to use right off the sander. I use 80 grit to remove material and 120 to finish my knife edge. I leave the steel at factory finish to creat a more earthy realistic feel that I prefer. I then 3500 RPM wire brush after all heat treating. Sometimes it is nice to hit the master bevel one more time to brighten it up after heat treating. I use a Ryobi 4″-36″ belt sander and generic 1″ by 30″ sander.I prefer using fresh factory made 1075/1080 High carbon steel. Please refer to my Trade off steel post for more info on how to get 1080 and other alloys.
As the graphics show, it is rather self explaining how to make and use this item. Simply creating a secure static for the knife to sit on and move it slowly but firmly across the belt until the desired edge is created. I modified mine to be more adjustable and use the large clamp as a handle which can be a pain but creates a more flexible tool if holes are not desired on your tang. I typically mount in antler so I use a Scandinavian tang shape.
Examples of blades made on my jig:


A finale note I would like to share regarding this jig concept is the profound effect it has made on my freehand knife making. It has steadied my hand and given the proper example of thorough steady grinding required to make a nice functional knife. Now when a roughly forged blades is needing an edge but does not fit on the jig I can easily achieve a nice uniform convex/scandi edge with great success>
Example:


I hope this will help on the road to better knife making, it has helped me greatly in my own progress and has redefined my art form in many ways.
Cheers!
H-
A few new pieces
This is a small gallery post before I do a full article on the Scandi Edge jig.

French Nail Trench knife. 3/8″ steel stock. Custom made for someone.
RRS Scandi. Full steel. 1040 no temper. Runic engraving. Lanyard hole.
Stag Scandi 1080 steel. shallow edge. Has some errors but is a good piece.

French Nail Zombie Apocalypse Rebar version. HC.

Thanks for reading
H-
Knives And Jewelry Gallery 2012
Jewelry and Athame in 2012.
HC Rebar 40 Grade. Polish/natural finish.

Mjollnir Amulet. Upcycled steel with SP ring.

HC Railroad Spike Knife

Norse Serpent

Forged Mjollnir With Loop.

Coin Silver Mjollnir with Solid 925 Ring.

These are just a few of the items being produced in my fire between late 2011-2012. Hope you enjoyed the gallry.
H-
Norse West Shop. Tons of New items!

REBAR part 2 40 grade success story.

40 grade domestic Rebar forged into Norse Athame

40 grade Athame.

New Creations Gallery Yule 2011/Safety Bullet Points.
Scandinavian Bush Knife. 1075/1080 blade steel with oil quench.


Spring Steel Heating Color Guide For Knife Making

This will be a short but important post. Above is a piece of heated spring steel showing the color needed to do different things. Sometimes having a true to life visual reference is the best way to get a feel for a certain technique or process. I hope this helps all the people just now jumping into the world of knife-making. The red color in my experience gets the most hardening but you can also quench at orange with good results.
Cheers
Working with Larger scale blade: Bullet points and Explanation.


Forging a larger blade 14″-30″ can be very frustrating to do because of the time and consistency of the heating required to shape or heat for quenching. This post will address these 2 issues. First take a close look at the two photo’s above. you notice that the brick box is fitted with a drilled copper pipe, this is your air source and will allow you to create enough heat to do your work. I built this forge for the purpose of quenching a 24 inch Seax blade so I drilled the holes very small along to the pipe. This allows me to add just enough heat to get to red without worrying about burning the steel. Adjust the drilled hole size based on what you are doing. If you are forging then add larger holes for more air. I use old bricks because they retain a great amount of heat and are easy to get. I use briquettes because they can burn hot enough to melt steel or can be heated and maintained just to heat to red as I have done here. In the fire is briquettes and a mixture of hardwoods and ever green limbs. This setup can be built anywhere and works very well, if you shorten this exact design it makes a perfect small blade forge.
Step by Step:
Build forge.
Lay your drilled pipe and attach to air supply.
Lay coal around pipe.
Lay blade on top of coals (briquettes)
Add another layer of coal.
Add a layer of wood and light fire.
Allow fire to gain strength before turning air supply on.
When fire is ready turn on air and allow heat to build in the forge.
Heat steel to noticeable red color.
Remove and quench.
1040 and lower quench in water.
1050 and higher quench in oil.
Hope this gives an idea of how to tackle larger projects.
H-
Iron and Steel Gallery (New creations)

Forged iron Rams Head Athame. 42RC.

Forged RRS 1040- 52RC.

Forged 40 grade Rebar. Very well hardened. Currently used as a utility knife.
Outside the box-The new cutting edge. Bushknife Tech.

- The Starcke T1.5 Seax

New post!: its been awhile and I have been thinking of what I wanted to post and I decided to talk a bit about unorthodox knife edges and how they improve or atleast living up your creations. The knife above is a D-2 tool steel Starcke T1-5 Seax or Tactical Seax (Copyright Norsewest Industries 2011) The knife has a rather radical cutting edge in that is has only one bevel and the opposite side is flat ground. This allows the user to maintain the edge almost exclusively with a steel. I myself was skeptical having seen similar ideas in pocket knives with less than stellar results! but when I finished this version 1.0 prototype I was shocked how proficient the edge was and how truly sharp the knife is with a single sided bevel.

As you can see the side 2 shot notes the straight angle with no bevel. By using the Seax design it allows a perfectly straight cutting edge with no awkward to sharpen angles. Combine this with the single side bevel and you have an easily maintained Bushcraft knife with modern and ancient designs. So far this design has managed to make mince meat out of 3/4 inch rope, leather, vinyl, fabric and wood with total ease, so I recommend you think more creatively about your edging and have fun experimenting with new angles and applications to your knives.
Experimentation is a good thing in any craft or art form and without bold new directions and ideas no art form can survive. Always have fun and bring your best intentions into the workshop. Hope this inspired some out of the box Knife or any kind of metal crafting. stay tuned for new Starcke and Greenlandr Bush knife experimentations/ideas in design.
Copyright Norsewest industries 2011.
H-
Knife Making Quik Tip (Quenching temp) Magnet test.

A useful tip regarding quenching in oil or water:
When heating your blade the general rule is cherry red means it is ready to quench, however if you want to be more exacting with the temp you can try using a magnet. When your steel reaches red/orange test it with a magnet. If it is no longer magnetic it is ready to quench. A useful tip especially when using more technical steels that might require more heat to quench harden.
H-
Avoiding cracked/torn steel bullet points memo.

HOW TO AVOID CRACKS WHILE FORGING STEEL: (High Carbon Steel)
1. Forge at brightest orange or yellow. Do not forge at dull red.
2. Quench in oil only. Water can create a more explosive reaction causing bending or cracking in steel.
3. Old springs can make good blades but often have stress fractures. When possible buy 1095 from a steel company and start fresh.
4. Spring stress fractures can be less of a problem if you use the first 2 techniques. They often cause more cosmetic damage than functional damage.
5. When forging axe heads draw the eye out slowly at bright orange/yellow. Tearing can occur if done too aggressively at low heat.
6. When forging Real wrought iron ( Iron with silica still in it) Forge only at yellow. This material will crack and tear easily along its grain.
RAILROAD SPIKE:
This material is 1040 and will quench harden in water very well. Does not require tempering usually but that’s my opinion. Can be forged at orange without fear of cracks.
FORGING MODERN IRON (1018-Low carb steel)
This steel can be forged at orange with no fear of cracking because it lacks the temperamental issues of real iron or HC steel. Thanks to modern production techniques this material has the highest workability and ease of use of any steel you will find for decorative smith work. Contrary to modern metallurgical lore modern iron (1018) will harden after quenching but does not require tempering because it cannot reach a hardness level higher than 42RC. This gives the material high durability and strength. (Only thinner pieces of 1018 can obtain 42RC) Steel 1″ thick or more cannot get to this hardness level. This material I recommend most highly for those just starting out because it can be obtained easily at your hardware store and lacks the pit falls of HC steel.
H-
Knife Making Bullet Points! Steel, techniques and tips.

Hand forged Railroad spike.
A BULLET POINTS MEMO TO HELP ANYONE JUST STARTING OUT IN BLACKSMITH WORK:
STEEL AND ITS USES FOR KNIFE MAKING:
Modern wrought Iron/1018/Low carbon steel: Only use for primitive blades, blades you hang up on the wall or for props/ritual knives. Not for modern knife making. Max Hardness 42RC. However 42RC hardened steel will hold an edge for a period of time because it surface hardens a bit more than 42RC if heated in a carbon rich environment at high temperature. This is called carberizing or surface hardening. Smiths would put iron in a high temperature fire with bones and coal for a period of time to increase carbon content and is still done today in metal working. The thing I love most about 1018/Modern wrought is the ability to try these ancient techniques and see how you can use and perfect or even just understand what advantage it may have given the weapons of old . In the end a modern knife has long edge retension and iron knives had higher durability in battle but less edge rentension. Without a doubt the best material to start out with and practice technique.
Rebar: Can be worth experimenting with. For best results try Grade 60 and 75. Ultra strong material that does quench harden.
Files: Great for knives of all kinds, good high carbon steel. Forge at yellow/Bright orange to avoid cracking. Quench in oil only. Hardness roughly 58RC could go higher or lower depending. Temper 1hour 300/400 degrees.
Leaf and Coil spring steel: Great high carbon steel but has a tendency to crack in forged bellow bright orange. Oil quench only. Max hardness 58RC. Temper 1hour at 300/400.
440C Stainless steel. Forges nicely at high temperature and it quenches in oil or water. In my experience I have had no trouble heat treating this steel despite horror stories. Always temper for 1hour at 300/400 degrees.
Tool Steel: I do not recommend forging this steel as much as I recommend softening and grinding from bar stock. Heat to orange and allow to cool fully to soften. Heat treat by heating to bright red and quenching in oil. Then temper for 1hour at 300/400 degrees.
1040 Railroad spike: A fine medium carbon steel containing both the durability of iron and the hardness of high carbon steel. Quench in water, no need to temper. Max hardness is 52/56RC
KNIFE MAKING TERMS YOU NEED TO REMEMBER:
Anneal: To heat an already hardened metal back to its soft composition.
Temper: To heat a quenched blade and reduce its brittleness to a more durable state.
Quenching: To dip a blade into liquid causing the rapid removal of oxygen and close the crystal structure. (Hardening)
Hammer hardening: A technique used on bronze/Copper and low-carbon steel to increase hardness by hammering while cold.
Clinker: A waste material that gathers in your forge during the forging process.
TIPS AND TECHNIQUES:
When holding your hammer during forging it is important that you loosely grip the hammer and allow the weight to do the work. Always use a thumb over fist grip to prevent pain and damage to your arm.
When quenching your blade always insert it vertically and do not stir the liquid. This can bend the steel during the process.
Use water when quenching lower carbon steel to gain max hardness but it is best to use oil on high carbon to prevent cracking.
Always be aware of your steels color and if at yellow be extra careful not to burn or melt your steel. If your blade is sparkling its ruined.
When grinding if your blade turns black in a spot you have burned the carbon and possibly ruined the steel. Grind and cool-Grind and cool. Be patient.
Preheat all high carbon steels to red/orange and allow to cool fully before reheating and forging. This removes stress.
I hope This helps you in choosing steel and just giving you an idea of the process involved in forging not just knives but all kinds pieces.

- Wrought Iron Athame.

- HC Viking Seax

- Wrought Iron Athame with Chiseled Runes.
Thanks for checking out my blog!
Antler Hunting Bullets Points Memo ( How to find good handle material)

- Mule Deer antlers collected in the foot hills

There is no question that for thousands of years antler has been the best possible natural handle material available for knives. It is durable and weathers slowly unlike wood which can be destroyed by variations in temperature and humidity when Antler is almost not effected at all. To this day Neolithic antler tools are still found intact.
